
I was finally able to get back to work on Snow this month, after my break waiting for the final materials to arrive turned into a break to finish Christmas gifts! Snow is finally finished. I only have dress-form photos at the end of this blog because next week I have a studio photoshoot scheduled, so keep an eye on my Facebook and Instagram for the good stuff!
If you read Parts 2 & 3 of this blog, you know that things were nearly finished–the pants were fronted with suede, the skirt drapes and the jacket were made. All I needed was to bind and bead the jacket, and make the belt. (I’m also making a little costume for my bow, since Snow’s is wrapped in leather and fur, but I’ll show that off at the photoshoot.)

It took forever to get a hold of faux leather seam binding in exactly the right shade of off white. It turns out that not a lot of places sell faux leather binding at all, and those that do mostly have tan and black. I finally had to order off white from the seller Neotrims on Amazon (they also sell on eBay), and while it’s the perfect solution, it took weeks to get here–most of the reason for how delayed this blog is!

Sewing faux leather binding turned out to be another one of those places where Wonderclips are invaluable. Since this binding is basically just one strip of double-sided poly leather with a slit down the center of one side to facilitate folding, you can’t sew it like fabric bias tape. It doesn’t open up.

So I just clipped it onto the edges of the jacket and slip stitched each side. At first I tried sewing both sides at once by putting the needle all the way through the jacket and both edges of the tape, but I lost so much time constantly turning the piece this way and that to make sure the needle was coming through in exactly the right place, and fighting to pull it through that many layers that I decided just sewing each side seperatly would be more efficient.

As usual, Marionette was determined to help out by sitting exactly where the project needed to go.


Once I had put binding on the jacket and sleeve pieces, I put in grommets to attach the sleeves to the jacket.


Here’s the jacket body with binding and eyelets:

It took me forever to find a bead/stud that I liked for the centers of the diamonds. It is almost impossible to tell exactly what they are either in the show or in any photos of the costume I’ve seen. Eventually, I found these small rhinestone shank buttons on Etsy.
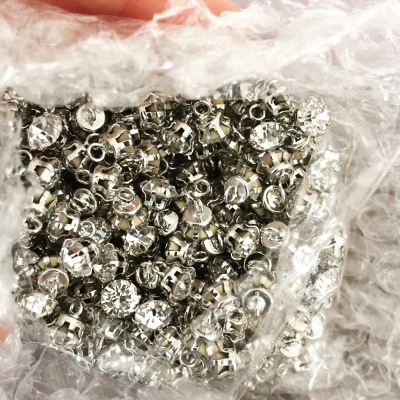
She didn’t have a big enough listing of them up, but she was very helpful and was able to special order 550 of them for me from her supplier. They were definitely the priciest part of this costume simply due to the quantity, but I think it was worth it.
Beading, as usual, took much longer than planned…


Because I decided to leave beads off of the area under the belt and down the center of the back (to avoid getting them tangled in my wig), I ended up using a total of 424 beads.
I left attaching the sleeves until later and moved on to the final piece of the puzzle: the belt.
I started with measurements. With the jacket on, my waist measures 30″, so I needed something with a 30″ finished length, plus a tail. It needed to be slightly narrower in the center than two of my rhinestone brooches, since they hang over the edges ever so slightly.


To make the belt pattern, I used a piece of stiff buckram interfacing. I measured and sketched out the shape I needed, then cut it out and tested it with the jacket.


After a few minor adjustments, I used that pattern to cut out the outer layer (silver metallic knit from Joann), and an inner layer of muslin, sandwiched the interfacing between them, and basted, leaving one end free to attach the buckle. The other end got two layers of off-white leather for the holes.


I them bound the length between buckle and leather with the same off-white pleather binding as the jacket.

While I was putting on the binding, I also added a loop to hold the excess length of the belt. It is a piece of the binding folded in half and sewn into the binding at the back of the belt. It then wraps around the front of the belt, and back under the binding on the other side.


When the belt was finished, I simply pinned the brooches in place.

The final step was to attach the sleeve pieces to the jacket. I used a worsted weight cotton yarn since I was having trouble finding any twisted cord of the right size and flexibility. The yarn is tied in a cow hitch (both ends through the grommet, then pulled through the loop left on the other side) around the upper portion, then both ends are put through the corresponding grommet on the lower portion and tied off. The dangling ends are each adorned with a silver beadHere.


Here it is, all finished! I’ll have awesome photos of me in the full costume in a couple of weeks, so check back, or follow me on Facebook and Instagram (@fabricnfiction)!


Edited to add these amazing photos from a shoot with Ben Marcum Photography! Wig by Custom Wig Company.


This is gorgeous!!! Fantastic work!!
LikeLike
The beading looks simply amazing, I love the texture it creates together with the fabric.
LikeLike
I am in total awe, talk about persistence ! Bravo !
Jennie
LikeLike
Wow!! I`ve been wanting to make this for a long time and this was helpful and inspiring! Awesome job!
LikeLike
Glad I found you. The stitch tutorial was well done.
Beautiful work on the cosplay items! ! Now I want to make the snow white outfit.
LikeLike