
It’s here! I’m finally starting on a project that I’ve been planning for close to two years!
At work, since we work with out hands, we end up talking about a lot of random things: food, Star Wars theories, the relative merits of various names, cats, genetics, and Harry Potter to name just a few. Not just about Harry Potter, of course, but about the whole Wizarding World: its history, its issues, its everything. We love to speculate about things, and with this kind of talk come all sorts of fun costuming ideas. We’ve all seen what wonderful things can happen when you put wizards in the 1920s in Fantastic Beasts and Where to Find Them. But before that even came out, I was planning this outfit: an 1870s bustle gown inspired by Ravenclaw House. It will be a historically-accurate (as much as anything is) gown, fit to wear to reenacting events, but the colors and the design are inspired by the personality and the symbols of Ravenclaw.
There will be more about that as I get to work on the actual gown, but before you can have an 1870s gown, you must have an 1870s under-structure, so that is where I am beginning.
For the chemise, drawers, and corset, I am using Laughing Moon #100.
 I started with the innermost layer: the drawers.
Victorian drawers are very strange to our modern sensibilities because for the most part, the are left open in the center to allow for ease of doing-one’s-business in large, complicated skirts. It would also be almost impossible to pull down a pair of drawers once a corset was tightened over the top of them, and certainly impossible to pull them back up again. Many modern reenactors choose to close them up, but I agree with the Victorian ladies–I’d rather get used to open drawers than fight with them in order to use the facilities.

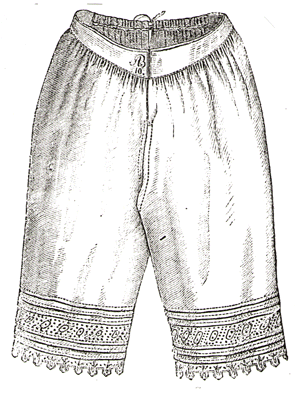
Both of these examples are similar to the ones that I made. The drawers are very simple to put together–only three pieces total, but the leg pieces are some of the strangest pattern pieeces I’ve worked with. They are wider than anything I’ve ever used that wasn’t an enormous skirt panel. I had to open up the piece of lawn and cut each leg individually, because they didn’t fit on the folded fabric!

The first step is the decorative tucks at the bottom:


Then you sew the legs into tubes–I used French seams.

Add a hem, and some lace if you want!

I cut out one inch self-bias strips to bind the open center edges.


The pattern comes with two waistband options: straight, and pointed, but, like most waistbands, they both go on the same way. The tops of the legs are gathered onto the right side of the waistband, and the back of the waistband gets pressed under and slip-stitched to cover the raw edges.

The chemise is a bit more complicated. By this point, chemises were no longer a bunch of squares, rectangles, and triangles, constructed in a way that allowed for the most efficient possible use of fabric. This chemise is gathered into a yoke that is shaped around the top of the bust.
I wanted lace around the neck and arm openings, so my first step after sewing the front and back of the yoke together at the shoulders was to baste some lace along the seam lines.


Once the lace was in place, I sewed the yoke and the yoke lining together, turned the whole thing right-side-out, and pressed. I ended up writing “right side” on the side I wanted to show, since the sides are basically identical.

The front body is gathered into the front yoke, and the back into the back yoke. Nothing is attached at the sides yet, just at the shoulders. The front yoke overlaps itself in the center, but that bit of the seam doesn’t get sewn yet.

Then, you sew the side seams–body, yoke, and yoke lining all in one fell swoop. I used French seams here as well. Now that everything’s all in one piece, you can finish the yoke lining.


At this point, you pin the center front yoke so that everything is nice and square and even, and then sew it in place at the bottom.

Buttons and buttonholes at the top:


And tucks and hem at the bottom:


And you have a Victorian chemise! I may add lace at the bottom later on to match the drawers, but right now, I don’t have anything in my stash that will work.

I am on to a much more fun part of the process now–the corset! There are so many steps before I finally get to the big, beautiful dress, but once I have this, I’ll have a good foundation for many other Victorian dresses to come! So many plans! If I can make half of them happen, I’ll be a happy costumer.

4 thoughts on “1870s Unmentionables: Layer 1- Chemise and Drawers”