Throughout the 18th century, as well as in the end of the 17th, and beginning of the 19th, men’s shirts were fastened with clever little buttons made of thread. These were simple to make with basic thread that anyone would have around the house. They were also durable through washings, and comfortable enough to have pressed against one’s neck beneath a cravat.
Here are the buttons on Brandon’s new shirt in action!
You can buy your thread buttons if you like, but I’m here to show you how to make them yourself! They’re very simple to create. Chances are that once you’ve done it once or twice you’ll be able to knock one out in no time whenever you need it!
What you’ll need:
Heavy linen thread
Needle
Scissors
A pencil, knitting needle, dowel, or other stick with a 1/4″ diameter
Step 1-Tie your thread around the sizing guide
Tie a regular-old square knot at the end of your thread. Don’t cut the thread off of your spool/skein/threadwinder just yet.Put the loop of the knot around your sizing guide (I used a pencil, but you can use any 1/4″ diameter stick-like item you have lying around), and pull tight.
Step 2-Wrap your thread
Wrap the thread around your sizing guide. A lot. For my very heavy linen thread, I did 30 wraps. If you’re using a slightly finer thread, I would go more like 40. It should seem like a slightly ridiculous amount of thread.
Step 3-Cut your thread
At this point, you can cut your thread, and thread the cut end onto your needle. You want a nice long tail, I went with about a yard.
Step 4-Move the thread ring from the sizing guide to your needle
Slip the wrapped thread to the end of your sizing guide and onto your needle. Be careful to hold the wrapped thread between your fingers to that it cannot come apart.
Step 5-Pull thread through
Pull your needle and working thread all the way through the center of your thread ring.
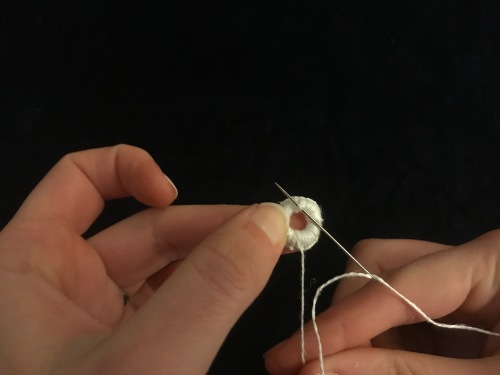
Step 7-Buttonhole stitch around the ring
At this point, you will begin to buttonhole stitch around the thread ring. Put your needle back through the center, and bring it up behind the ring, with the thread tail behind the point of the needle.When you pull the stitch tight, a loop will form around the working thread.Here it is in action! Needle through the center, thread behind the point of the needle, pull tight.Continue all the way around the ring, until all of the thread ring is encased.
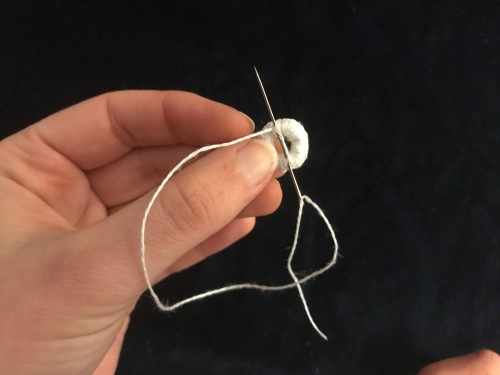
Step 6-Create the shank
Turn your button over so that the back is facing you. Pass your needle behind a thread or two on the opposite side as your working thread.You should now have a bar across the center of your button.Pass your thread across the same place several more times so that you have about four or five threads across the hole.Here is what you button should look like at this point.
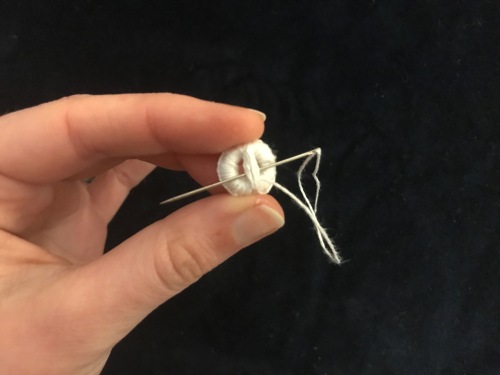
Step 7-Wrap the shank
Pass your needle behind the shank you just created.Wrap the working thread around the shank several times to keep everything together.
Step 8-Finished!
Tie it off and you’re done!
You can now make quick and easy thread shirt buttons whenever you need them!
I hope you found this tutorial helpful! If you have any questions, feel free to leave them in the comments, and I will answer as best I can.
Hannah is a reader, a writer, a costumer, a wig-maker, a historical interpreter, a cosplayer, a tea-drinker, and a lover of yellow.
View all posts by stopphannah
22 thoughts on “Tutorial: Thread Shirt Buttons”
Wow, this is awesome! May I use this buttons for closings in 18th century womens underwear, like a chemise and such?
Awesome, thanks for sharing! Finding good HA buttons is difficult and can be expensive for really nice ones, especially if you need a bunch. I like that these can be made to match a garment perfectly, end easily replaced if lost or damaged.
Sure! They could theoretically be made in any thick thread. You may need a few more wraps to make sure you have the ring thick enough. Heavy linen would be the most common option for 18th/early 19th century underthings, but that’s no reason why you can’t give other materials a try.
Looking at original garments I’ve never seen thread shirt buttons used on a French chemise, English shift nor on a petticoat. This sort of button was used on the collar of 18th century shirts. Eventually by about 1825 shell buttons & bone buttons replaced thread shirt buttons.
I was looking for a tutorial exacrly like this. Yours is very clear and instructive, I think one cannot go amiss now. I will have a go at my own thread buttons this weekend. Thank you for sharing.
Excellent article. Would these be suitable for mass-produced British Army soldiers shirts of the 18thC and indeed for those of the lower orders of society?
Thanks in advance!
Thank you so much for this post! I’m delighted I stumbled over it on pinterest. I suspect I will be making all kinds of buttons using your clear, simple directions.
If you’re making your buttons for historical purpose keep the button to no larger than 1/2”. The button in this tutorial looks slightly too big (roughly 3/4” or so). Also you’ll find them less likely to fold if you wrap them on a tapered point so you can fill in some of the donut hole. A somewhat small center hole is seen on original thread shirt buttons. Then, pull the thread very tight. Pulling tight will make a hard, firm button like originals.
Hi Paul! Not sure what in the photos is making them look that large, the button in this tutorial is about 3/8”-7/16”. They definitely turn out very hard and firm—it’s amazing what just thread can become! Nice tip about the tapered point.


Wow, this is awesome! May I use this buttons for closings in 18th century womens underwear, like a chemise and such?
LikeLike
Why did I expect them to be so much more difficult? Thank you for sharing, I will definitely make some!
LikeLike
Awesome, thanks for sharing! Finding good HA buttons is difficult and can be expensive for really nice ones, especially if you need a bunch. I like that these can be made to match a garment perfectly, end easily replaced if lost or damaged.
LikeLike
Very cute buttons! Thank you for posting the tutorial. 🙂
LikeLike
Can these also be made from perle cotton? Thanks for such a clear tutorial
LikeLike
Sure! They could theoretically be made in any thick thread. You may need a few more wraps to make sure you have the ring thick enough. Heavy linen would be the most common option for 18th/early 19th century underthings, but that’s no reason why you can’t give other materials a try.
LikeLike
Were they ever used for decoration?
LikeLike
I don’t know any examples of them being used decoratively. As far as I know, they were only used on underthings like shirts, chemises, or petticoats.
LikeLike
Looking at original garments I’ve never seen thread shirt buttons used on a French chemise, English shift nor on a petticoat. This sort of button was used on the collar of 18th century shirts. Eventually by about 1825 shell buttons & bone buttons replaced thread shirt buttons.
LikeLike
Es un bello trabajo. Muchas gracias por compartirlo!
LikeLike
I was looking for a tutorial exacrly like this. Yours is very clear and instructive, I think one cannot go amiss now. I will have a go at my own thread buttons this weekend. Thank you for sharing.
LikeLike
Many thanks for this nice and clear tutorial! It only takes some minutes to make a small button like that, but I had no idea!
LikeLike
Excellent article. Would these be suitable for mass-produced British Army soldiers shirts of the 18thC and indeed for those of the lower orders of society?
Thanks in advance!
LikeLike
Thank you! I would think so, yes. They were commonly used on all sorts of undergarments (shirts, shifts, etc…)
LikeLike
Awesome! Thank you for sharing.
LikeLike
This is wonderful – and so simple. I’m delighted I stumbled over this on pinterest.
Thanks for sharing such nice, clear directions.
LikeLike
Thank you so much for this post! I’m delighted I stumbled over it on pinterest. I suspect I will be making all kinds of buttons using your clear, simple directions.
Thanks again!
LikeLike
If you’re making your buttons for historical purpose keep the button to no larger than 1/2”. The button in this tutorial looks slightly too big (roughly 3/4” or so). Also you’ll find them less likely to fold if you wrap them on a tapered point so you can fill in some of the donut hole. A somewhat small center hole is seen on original thread shirt buttons. Then, pull the thread very tight. Pulling tight will make a hard, firm button like originals.
LikeLike
Hi Paul! Not sure what in the photos is making them look that large, the button in this tutorial is about 3/8”-7/16”. They definitely turn out very hard and firm—it’s amazing what just thread can become! Nice tip about the tapered point.
LikeLike