
There has been enough interest in my new Tambour project, that I thought I would start putting up some how-tos! It’s not the sort of thing that I can do all in one go, so I will be putting up several lessons over the course of the next few weeks and months.
I will be focusing on lace in these lessons, since that is how I primarily use tambour at the moment. I may expand this in the future as I work on other projects, but all the techniques you see here are basically the same for work on woven fabrics.
A bit of history: Tambour is a form of embellishment that originated in or around India many hundreds of years ago, and eventually spread to Europe in about the mid-1700s as tambour embroidered textiles became popular there. While at first tambour-work was all imported, by the late 18th century it was a popular pastime for wealthy women, and became especially beloved as an embellishment for the diaphanous dresses of the 1790s and early 1800s. Tambour lace remained very popular until sometime around the 1840s, when machine-made lace really began to take over.
For a more detailed look at the history of tambour in Europe, check out this post by Two Nerdy History Girls.
Today, I am going to walk you through three basic steps:
- Preparing your materials and starting the thread.
- The basic tambour stitch.
- Finishing the thread at the end.
What you will need:

- A free-standing embroidery frame/hoop. Round ones are usually seen in images of women working tambour at home, while large rectangular frames are used by professionals working on entire garment pieces. Your frame can be floor, table, or lap sitting, but must leave you free to use both hands.
- A tambour hook/tambour needle–these come in a range of sizes depending on your fabric and thread. I believe the one I’m using in this tutorial is a #90, but to be honest I put it in the holder a long time ago, and I’m not completely sure! You can get varieties both with or without a latch. I prefer without, but feel free to experiment if you find that you have trouble holding onto the thread without one!
- A hook holder–this is the wooden handle that holds your hook while you work.
- Fabric–I generally work lace on cotton bobbinet, but you can also try your hand at silk net, muslin, linen, silk chiffon, or any number of other fabrics. I would not recommend trying to work tambour on tulle from your basic fabric store. This isn’t one of those times when starting with cheap and working up to the nice stuff is helpful. Basic synthetic tulle is too flimsy, and tends to catch on the hook, and you will end up pulling all your hair out before you go far. Please don’t decide you hate tambour because of an experience with synthetic tulle!
- Thread–any non-divisible thread will do (i.e. no embroidery floss). I am using DMC Cordonnet Special in size 70. Embroidery threads like this are nice because they have a lovely finish, and they work up into crisp, substantial stitches. If I want something very fine to fill in motifs, I use plain Gütermann 100% cotton sewing thread.
- Scissors
- A needle
- A pin
- A pair of pliers can also come in handy, but are optional.

I like to shop in the Lacis Museum online store for my tools. You can find both a lap frame like the one pictured in this tutorial, and a table-standing tambour frame on this page. You can find hooks and holders here. You can find all of these things other places by googling the items, but they all tend to be the same products sold through different retailers.
I buy my bobbinet from several different retailers including Renaissance Fabrics, Mary Not Martha, and Originals by Kay.
On my Pinterest page, you will find a board of Tambour Resources, which I will try to keep updated as I find new or interesting suppliers. Note that I won’t necessarily have personally tried all of the things pinned there.
Step 1: Prepare your materials.

You will want to transfer your design to the fabric before you place it in the hoop. Since I am just demonstrating the stitch at this point, I did not draw a design, but there will be upcoming tutorials in following a design where I will discuss it in more detail. I use a blue water-soluble fabric marker to mark designs if I will not be demonstrating to the public in period clothes while I’m working on them. (Always test your marker on a swatch of fabric first to make sure it comes out). Otherwise, I draw it in pencil, which generally rubs away enough to be un-noticable by the time the project is finished, or I baste over the design in very fine white thread that will be hidden by the work when finished.

Step 2: Secure your thread.

On the underside of the fabric, wrap the end of your thread several times around the pin until it feel secure. Leave the working end of the thread connected to the spool. If all goes well in a piece of tambour-work, you will not need to cut the thread at all until the end.


Step 3: The Basic Stitch
I suggest that you read through this entire step a couple of times before trying it yourself. Having all of the information in your head before you begin will help avoid confusion.


You can see in the video that I both wrap the thread and rotate the hook clockwise. Doing both in the same direction makes it easier to catch the thread in the hook. I then “unrotate” the hook counterclockwise above the fabric, so that it untwists the thread loop as I move to the next stitch.
Don’t worry too much if you drop the thread, or accidentally take your hook out of the loop. Simply put it back through the loop, and the next cell, and continue. Do be careful, though, if you pull on the working thread while the hook is not through the last loop, the entire work can unravel! This is great if you realize you made a mistake in the design and want to go back to fix it–you can simply pull the thread until the mistake is gone, reinsert your hook into the free loop, and carry on as if nothing happened. But it’s not so great if you just got the hang of things and accidentally pulled out all of the beautiful stitches you just painstakingly chained together!
Once you’ve gotten the hang of how to make the stitch, the most important thing to focus on is tension. If you don’t hold the thread taut enough in your off hand while you embroider, the stitches will be loose and sloppy once the hoop tension is released. If you hold it too tightly, it pull the stitches too tight, the fabric will pucker. Focus on letting the thread glide lightly between your thumb and finger below the fabric. Think of the gentle, flexible tension you feel when pulling out the bobbin thread on a sewing machine.
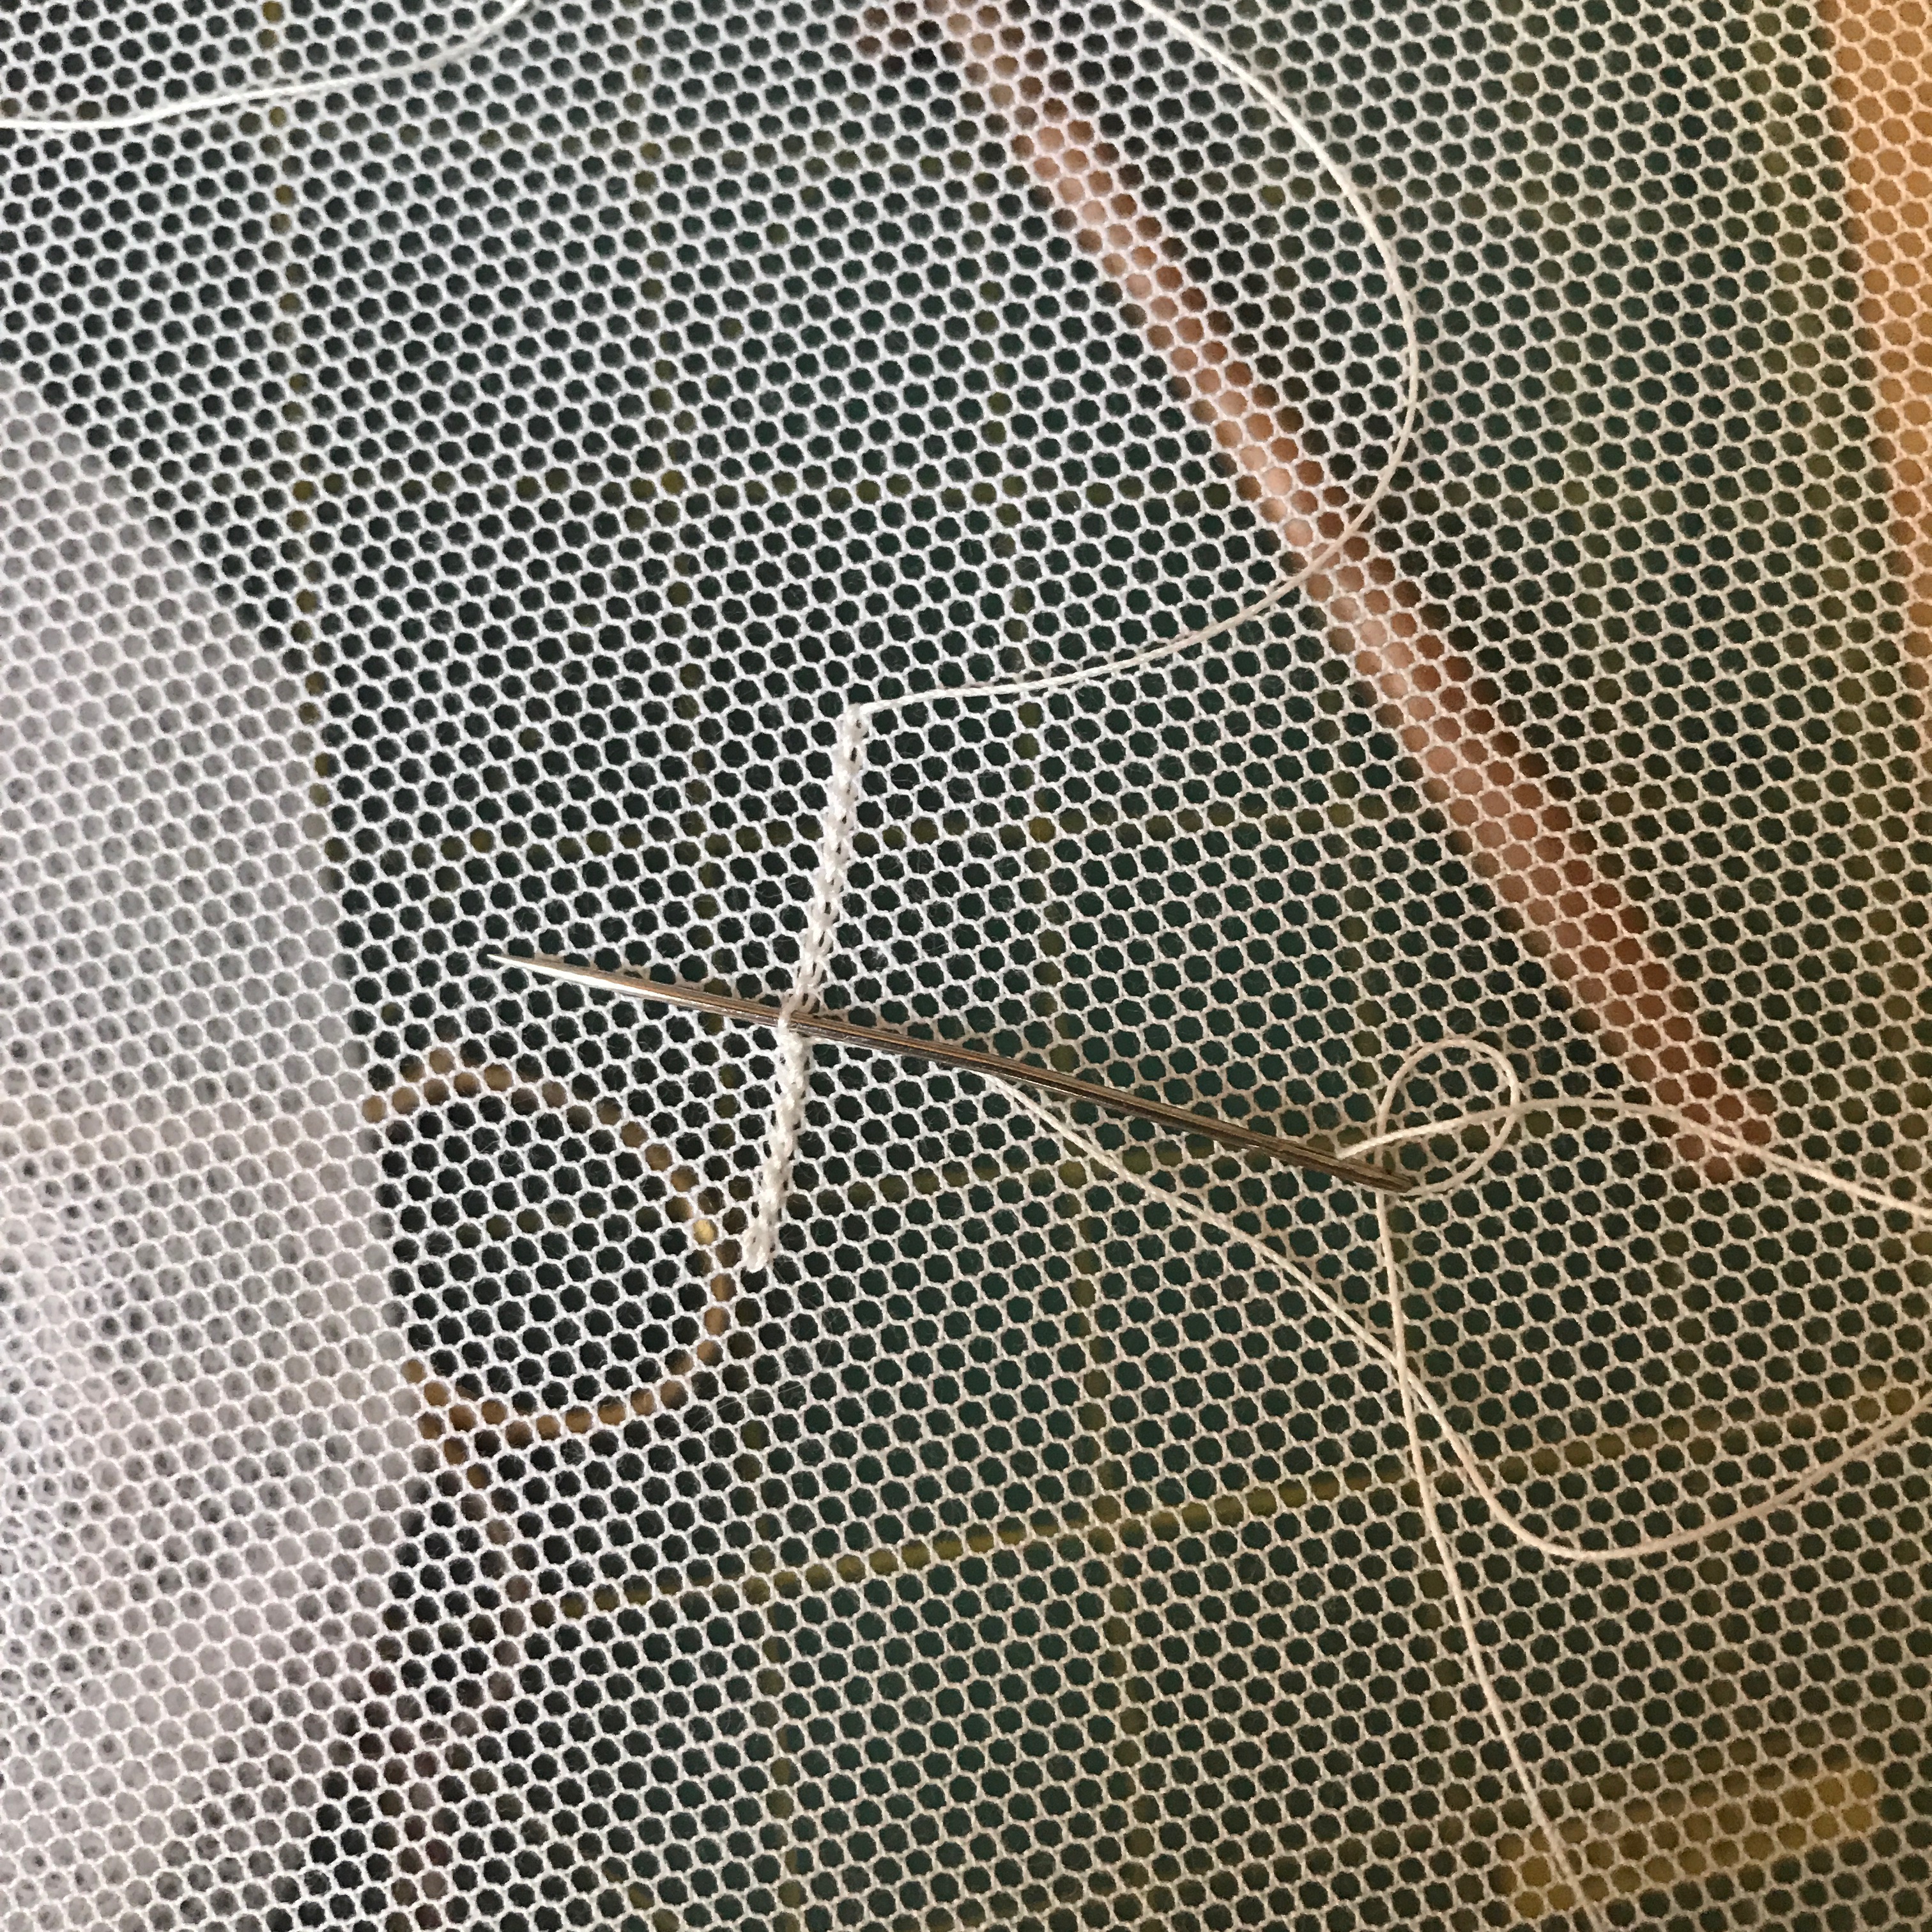
Step 4: Finish your thread.


Step 5: Weave in your ends.
I cannot stress this enough: do this as you go! How do I know this? Because I regularly leave my ends until I finish a project because weaving in ends is BOOOOOORING and I always want to put if off. But believe you me, weaving in ends is about 10,000 times more boring if you leave twenty or more of them until the end of a project and you have to spend hours weaving all of them in at once. Learn from my mistakes. Much better to do it as you go. Luckily, if you are good at plotting out a path for your design, you should be able to do a single tambour motif, or possibly more with only two ends to your thread. In later tutorials, I will show you how to skip from place to place in your design without needing to cut the thread, and other fun time-saving tricks.\
And now: weaving in ends.


Do the same with any other loose ends, and trim any excess thread.


You can lean more in Lesson 2, which covers following a simple pattern, including advice on transferring your pattern, deciding how to work through it, and going around curves!
Keep your eye out for more tambour tutorials coming soon, and if you have any special requests or questions, please feel free to ask!

Thank you for so many pictures! In upcoming tutorials, could you detail how to turn corners and fill in areas? I see lots of extant examples with the tambour chain used to completely fill in a flower petal, etc., and can’t figure out how to turn the cain stitch line tightly enough to do the fill work.
LikeLike
Those are definitely good things to add to my list, thank you!
LikeLike
I wanted to thank you for these tutorials!! I love these techniques and have no way of going to a teacher for learning them, so I really appreciate you sharing your knowledge!! Thank you so much!! ❤
LikeLike
Thank you! It’s glad to hear that you’re enjoying them!
LikeLike
Thank you! This is exactly what I needed to help me get started. Your instructions are so clear.
LikeLike