
Due to an overwhelming amount of demand on my social media as I’ve been posting process photos of my new green Spencer, I went ahead and put together a little tutorial on the style of trim I’m using.
Rouleaux are, quite simply, thin, bias-cut strips of fabric sewn into tubes. You probably have quite a few bits of rouleaux in your wardrobe without even realizing it in the form of spaghetti straps, coat hanging loops, and other utilitarian elements. However, these tubes aren’t just useful, they can also be beautiful.
Rouleaux trim is simply taking a rouleaux tube and stitching it down to a garment in the shape of a design, creating a beautiful, wearable piece of 3-dimensional art. While it is relatively uncommon (though not unheard of) today, rouleaux trim is was very popular in the early 19th century, particularly in the 18-teens and ’20s. I would not be at all surprised to see it crop up throughout the 19th century, but until I have examples of that, I will withhold a verdict. Similar techniques, however, were certainly employed though the 1800s and early 1900s using soutache braid, cord, or other thin, flexible items to create a design. If you want your pattern to match your fabric however, rouleaux is truly the way to go. All the early 19th century examples of rouleaux I have seen have been made with matching fabric to the main garment. They have also all been outer garments like spencers and pelisses, rather than gowns. That doesn’t mean those aren’t out there, just that I haven’t seen them–always keep an eye out for examples, don’t just take my word for it!


I’m going to show you how I do this technique. It’s the sort of thing that there are probably many ways to do, but this is the one that works for me.
You can read all about the spencer featured in the tutorial photos here.
Preparing the Bias Strips
Before you can make beautiful, rouleaux-trimmed garments, you’ll need to start with a whole lot of thin, bias-cut strips of fabric. It’s possible that some in the 19th century were done with strips cut on the straight grain as well, since it is a more efficient use of expensive fabric. I haven’t had a chance to examine any of these garments up close enough to be able to see the grain of the fabric, but based on how neatly the extant examples of rouleaux trim go around curves and tight corners, I would guess that many, if not all, are cut on the bias.
Note: What is the bias, you may be asking yourself? Bias cut pieces are cut diagonally across the grain of the fabric, rather than parallel to the selvedge edge (the finished, uncut edge of a length of fabric).
You can find the bias of a fabric using a marked cutting mat, a set square, or any other device that will show you a 45° angle to the selvedge of the fabric.
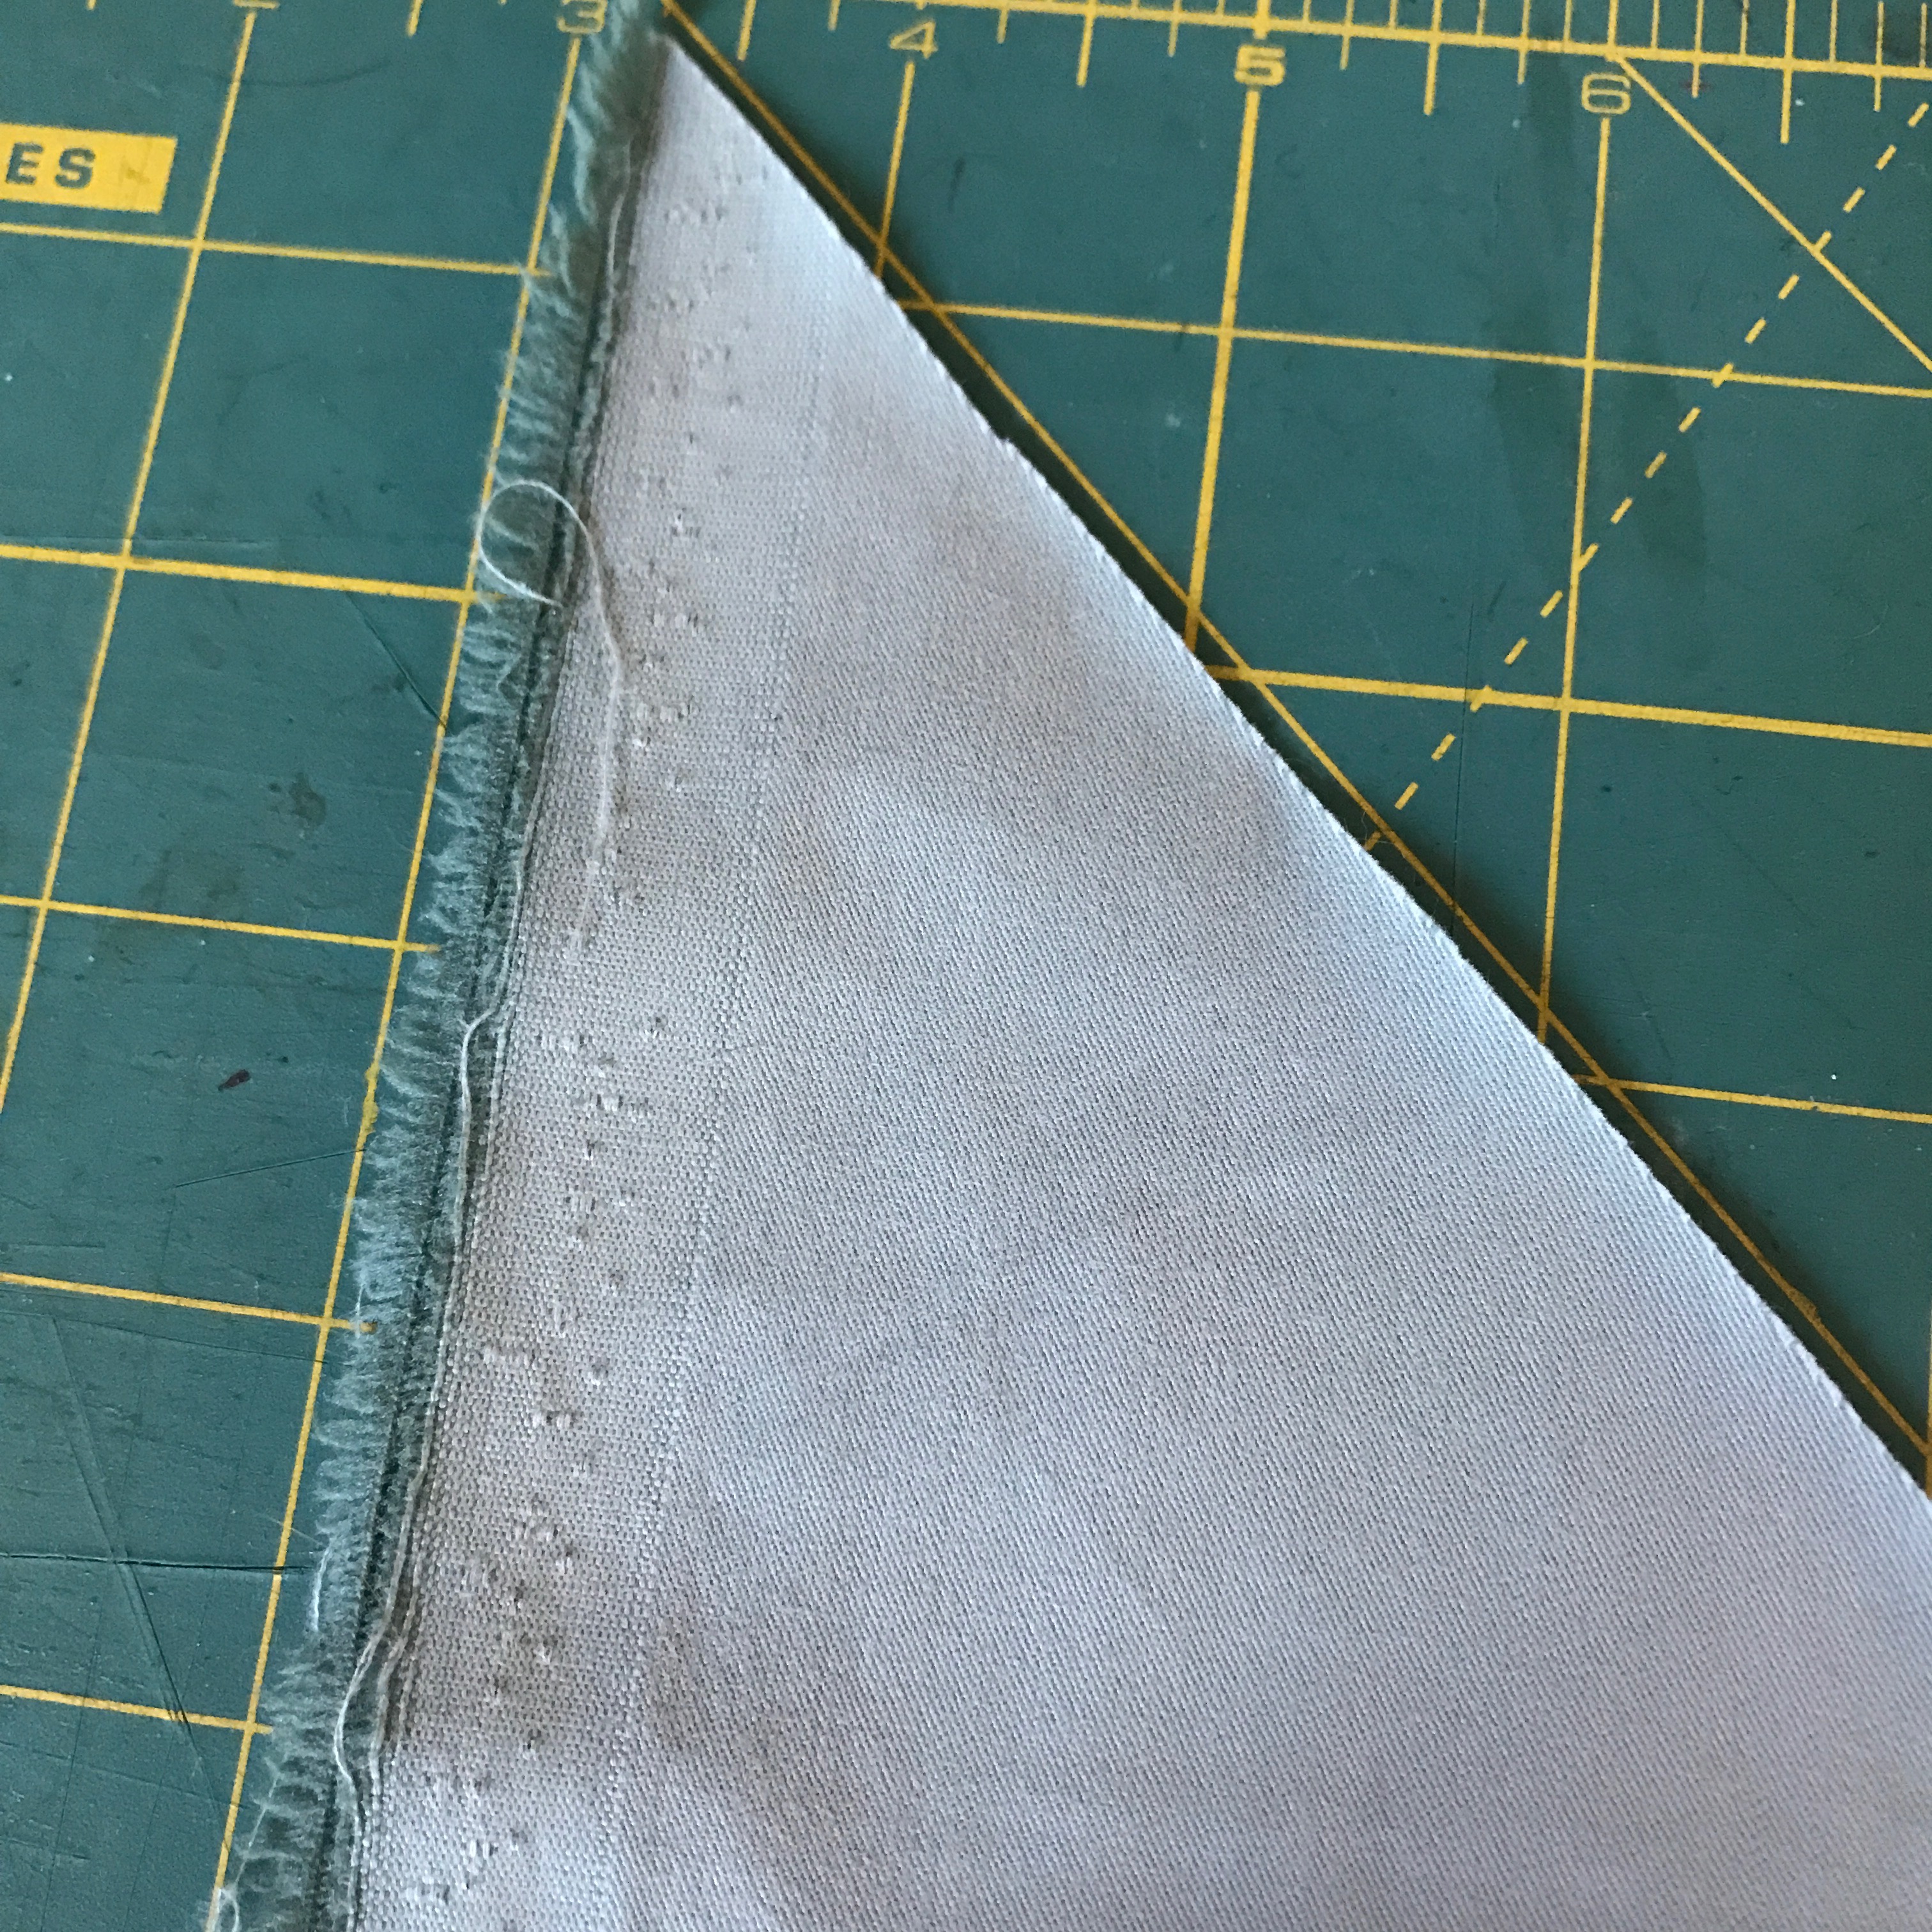
From there, you can simply cut parallel strips based on your first angled cut. The width that you cut your strips is entirely up to you (within reason), depending on how thick you would like your rouleaux to be. If you’re unsure, do a test piece a few inches long first, just to get an idea of what size you’ll get. I ended up going with half-inch strips, which got me a nice tube about 1/8″ wide out of my lightweight cotton twill fabric. Your mileage may vary depending on the thickness of your fabric.
I used a rotary cutter along my ruler to get strips. You can also use your ruler to draw lines and cut with scissors, whatever floats your boat and gets your some bias strips.


Next, you’ll need to sew your lovely bias strips into one very long bias strip. (Of course this depends on exactly what you are doing. If one bias strip is enough to do your entire design, obviously feel free to skip this part.

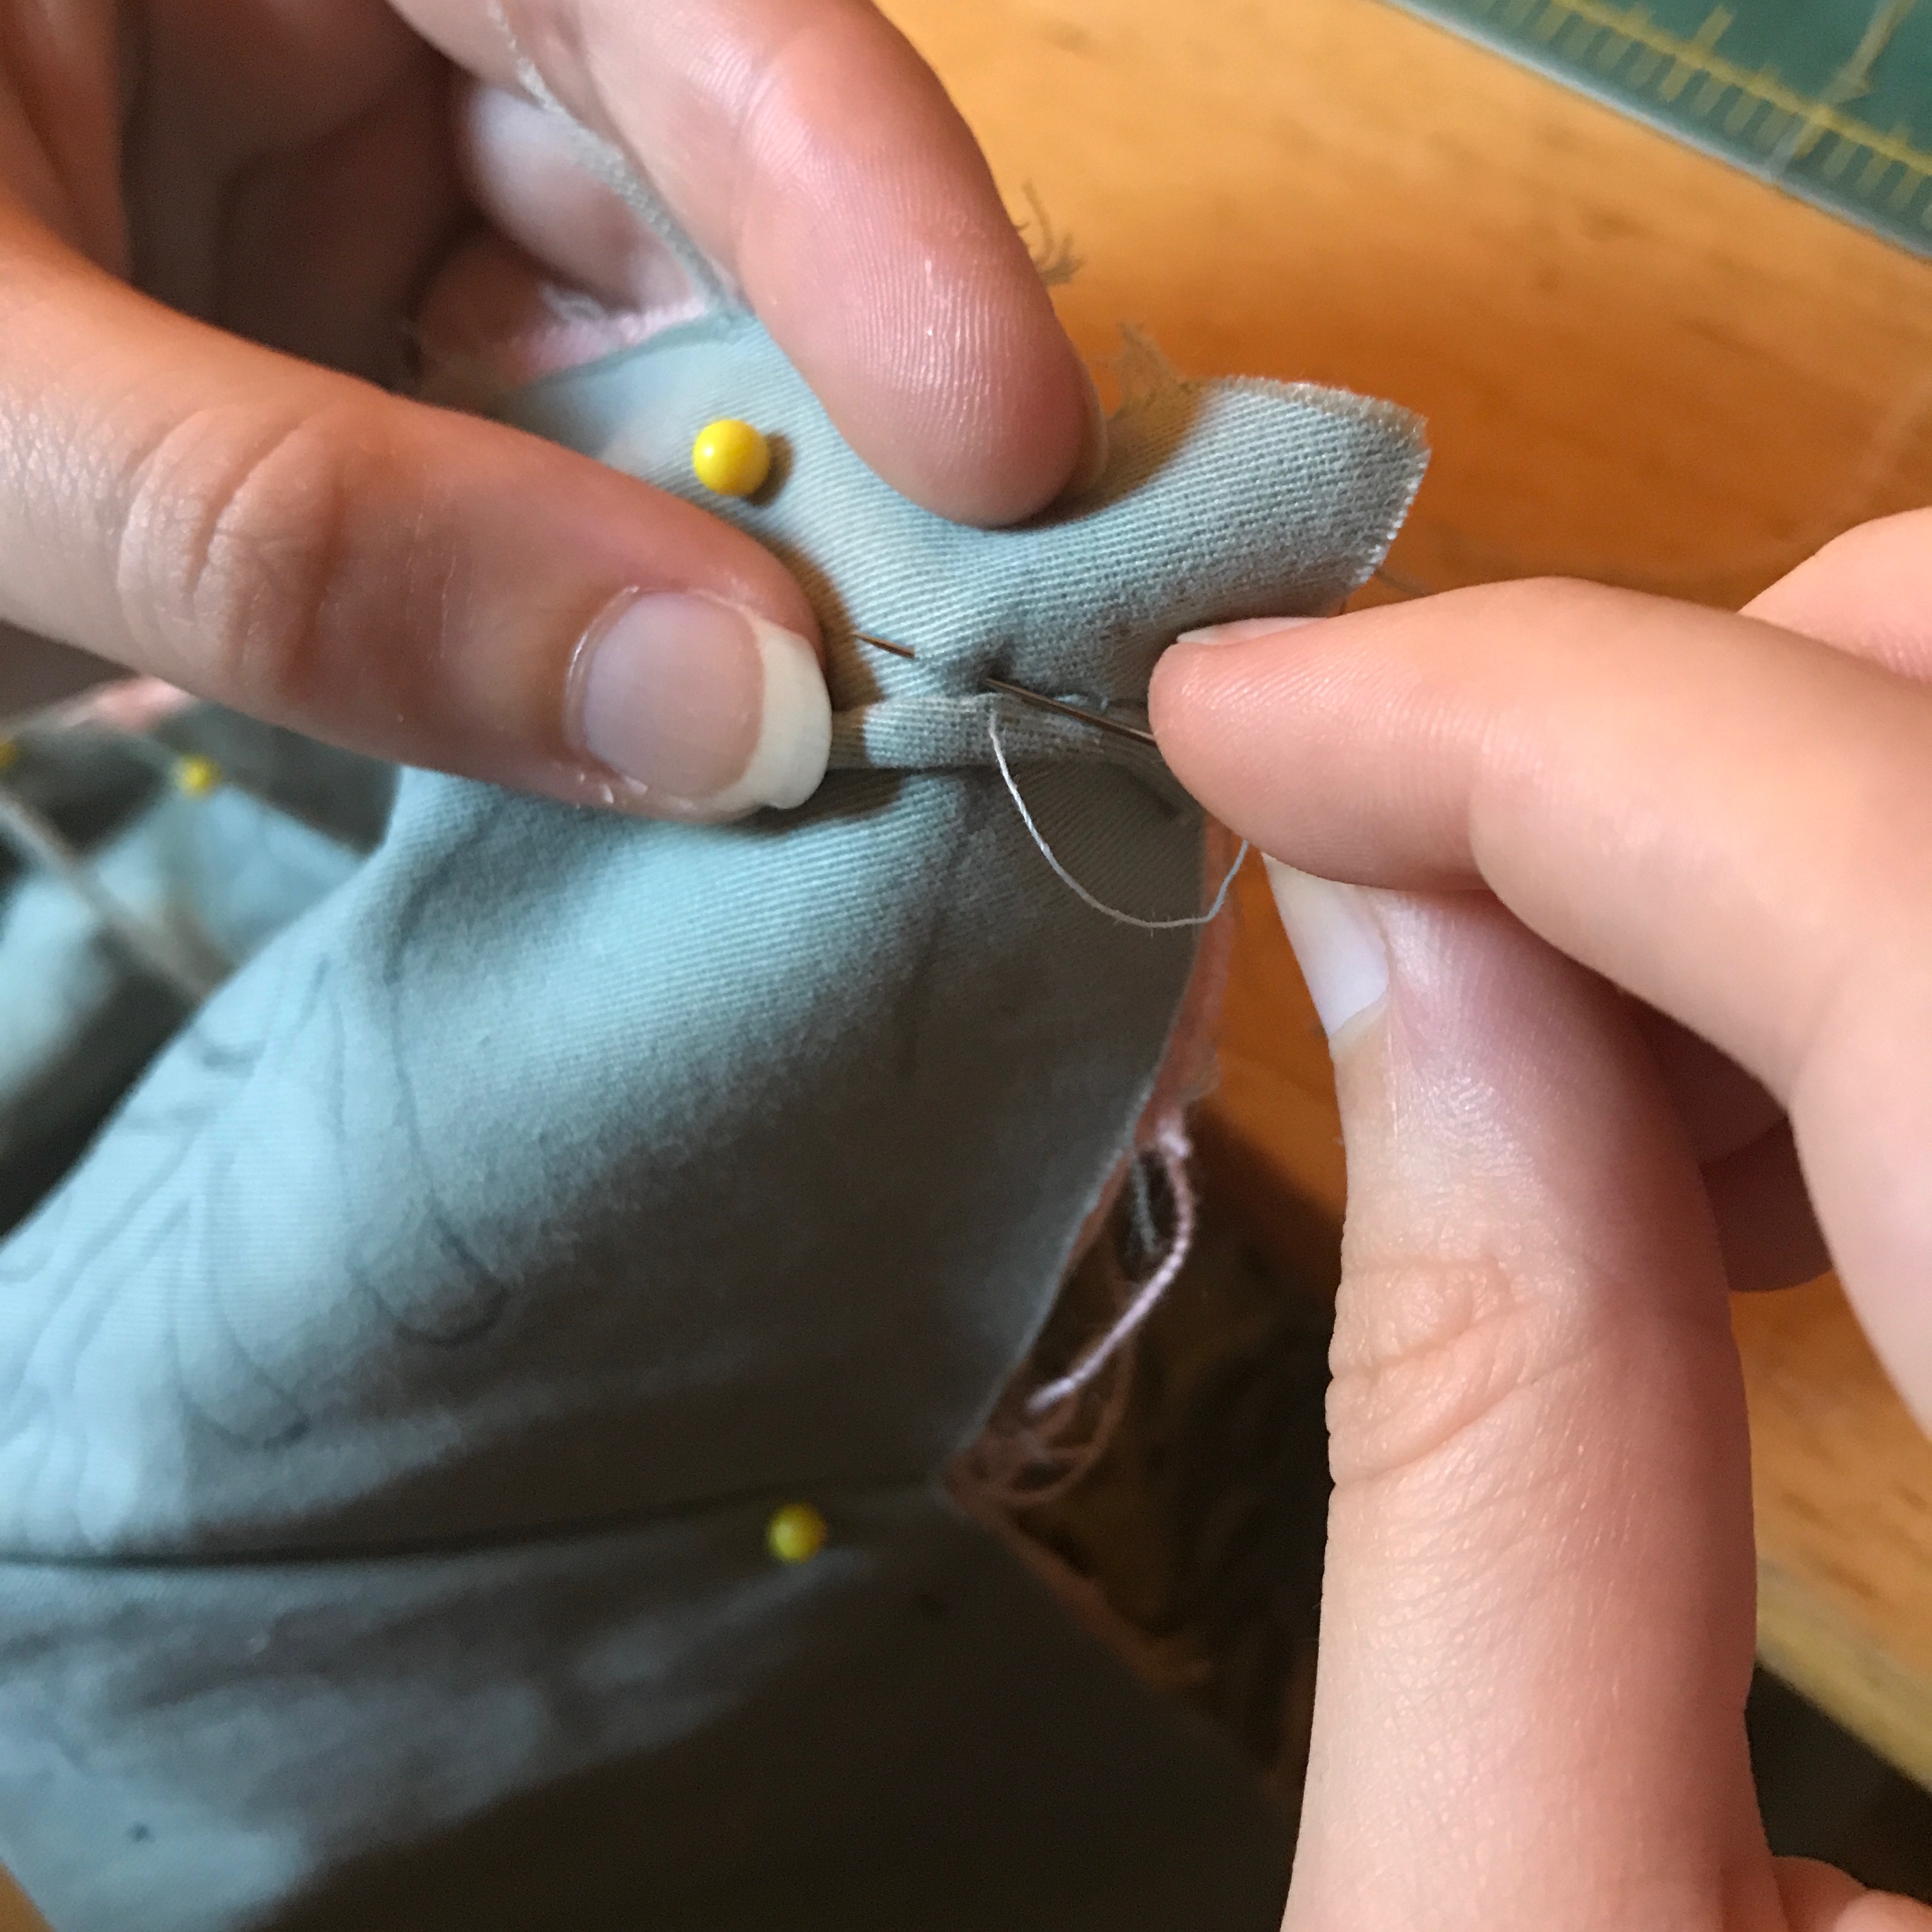
In order to keep your bias flexible, and your tube thin, you will need to sew the pieces together with the grain of the fabric, rather than across the bias. To do this, line up your two strips, right side to right side, at a right angle. At this point, you may have edges that line up nicely because they were the selvedge edges of your fabric, and are therefore already little 45° angles. If not, you will need to trim the ends to 45° angles so that they line up as in the photo above.
You will notice that the corners of each piece hang over the edges. This is exactly what you want. Stitch from one inner corner to the other. You want a nice, small seam allowance for this. This angled seam with keep the bulk of the seam allowance distributed along the strip, rather than all piled up in one place.

When you have finished sewing all your pieces together, press the seams open very well. You want the extra fabric from the seam allowance to be distributed as much as possible, so the last thing you want is for it to fold up on itself.
Sewing the Rouleaux
If you like, and if your fabric is light enough, you can bypass this entire method by sewing a narrow seam allowance on your machine, and turning the strip right-side out using a rouleaux turner (these little tools look like a thin piece of wire with a loop at one end, and a little latch hook on the other, and can be found at most fabric/craft stores).
HOWEVER, there are several reasons why you may want to/be forced to make your rouleaux by hand. First of all, you may prefer to hand sew for the sake of historical accuracy. Second, your fabric (like mine), may be a bit too thick to turn right-side out once you’ve sewn your desired size of tube, even with the seam allowance trimmed very tiny. I nearly cried when I realized the several yards of rouleaux I had sewn wouldn’t turn the right way out, no matter how hard I tried. I had already trimmed the seam allowance down to 1/16″, and every effort to turn the tube shredded the seam allowance until the piece was useless. If I wanted to use this technique, I would have needed to make my rouleaux much wider, which would have completely destroyed the delicate finished look I was going for.
Luckily, I put on my thinking cap, and came up with this technique inspired by the rolled hem in order to keep all of you from pulling your hair out the same way I did.
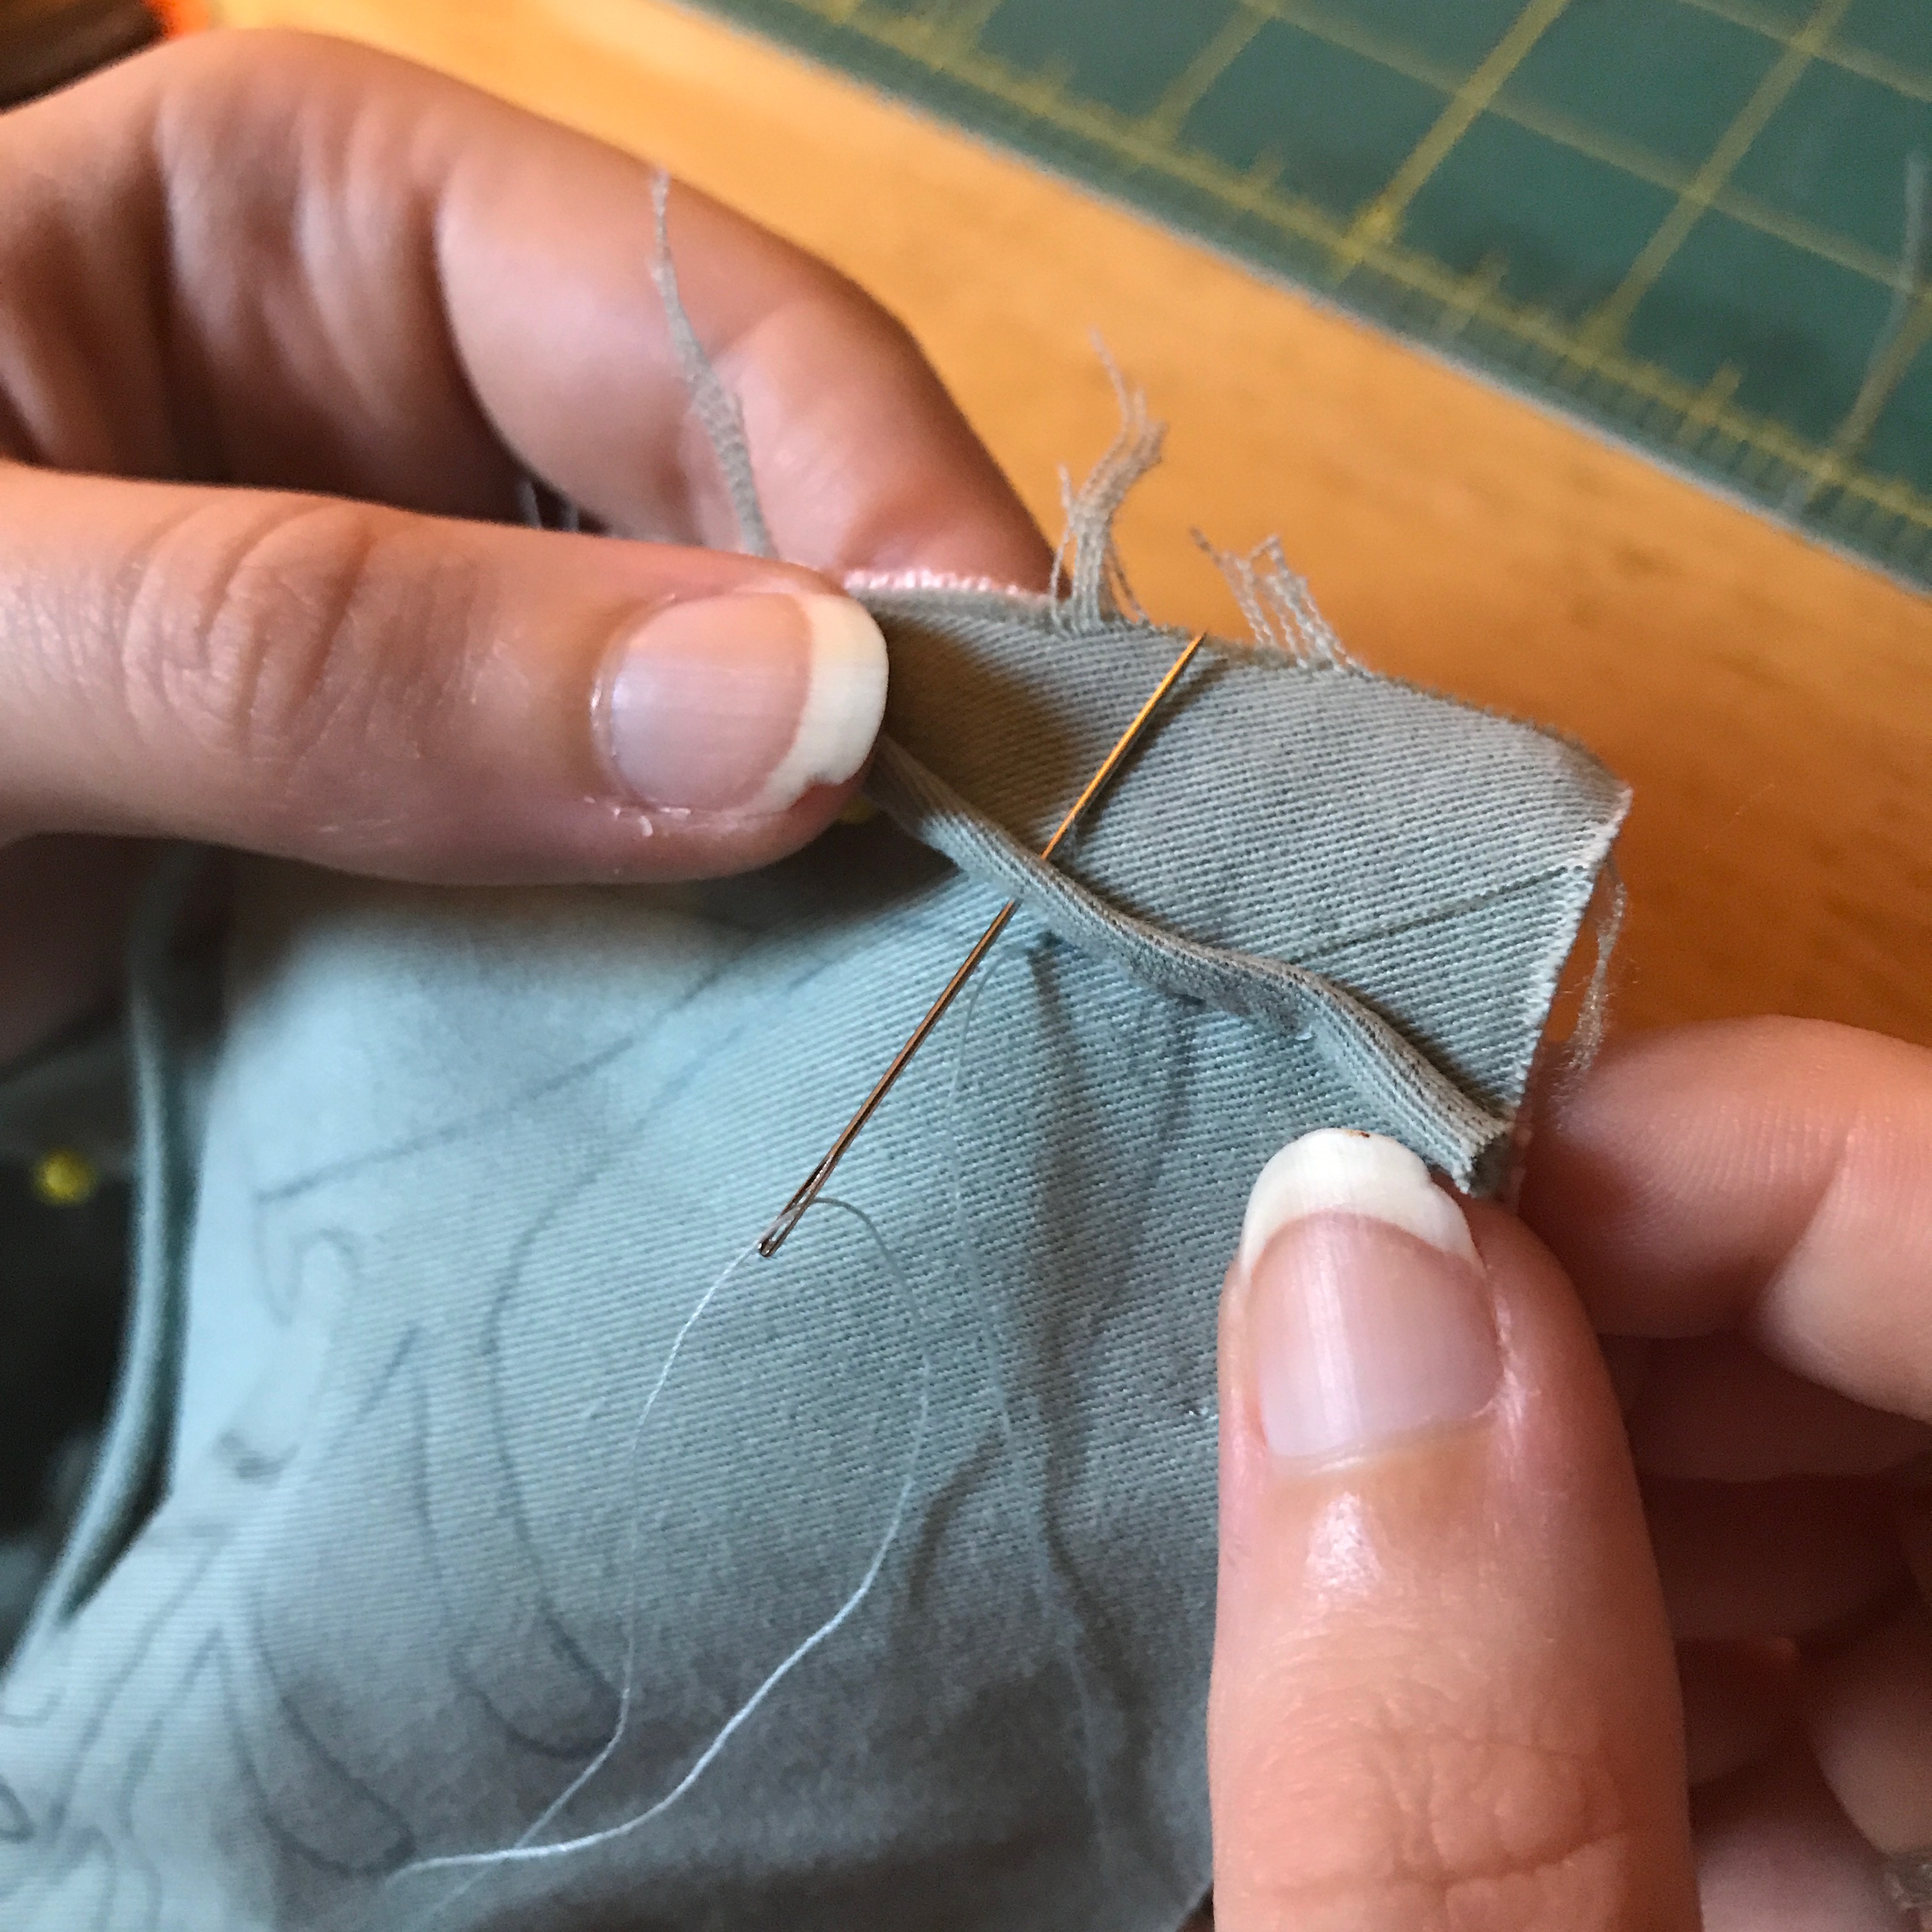
Start yourself off by pressing the edges of the very end of your strip into the center on the wrong side of the fabric, like so:


At this point, I like to hand the end of my strip to my sewing bird in order to take some of the tension out of my left hand. Using a sewing bird or clamp to hold your fabric in place is a great way to help yourself if you experience pain while hand sewing, or if you want to avoid pain in the future, or just generally want to make your life easier. If you don’t have a sewing bird or clamp, don’t worry. You can put the end under something heavy, use a regular old clamp to clamp in to the table, pin it to the knee of your pants, pin it to the arm of a chair or couch. Basically you have lots of options, but I do recommend that you find a way to hold one end still while you work. It will allow your to work much faster.


Here is a video illustrating the whole process of holding the folds in place, stitching, and pulling tight:
Attaching the Rouleaux
Before you can attach your rouleaux, you will need to draw or trace a design on your fabric. You can draw it out with a pencil or water-soluble marker, trace it with tracing paper and a wheel, prick and pounce, or use whatever other transfer method may strike your fancy. I based my design on the pink spencer shown above.
Note: I stitched my rouleaux to both the fabric and lining. Since the fabric is a light twill and therefore has a slight stretch, I wanted to make sure it had the structure of the linen lining to support the heavy trim. Your fabric may be sturdy enough to hold the trim by itself.
Note: these instructions are for a pattern that allows the ends of the rouleaux to disappear into a seam allowance. If your design is in the middle of a piece, far from a seam allowance, you will need to begin making your rouleaux by folding up the short end of the bias strip so that your tube has a finished end, and doing the same at the other end of the tube.


From now on, your stitch pattern will be as follows:

This process of moving the rouleaux above and below the stitching line as your sew will help keep tension even along the rouleaux, and ensure that it sits directly on top of the line, rather than leaning to one side or the other. Be careful not to pull your stitches too tight, or you could end up puckering and shrinking your entire garment piece!
Continue to stitch in this pattern. Here is a video to help you:
Now that you have the basic process down, here are a couple more tips to help you at tricky parts of your design.
Tip #1: Tight curves
When going around tight curves, take smaller stitches through the fabric to help the rouleaux follow the pattern smoothly.
Tip #2: Sharp corners

When making sharp corners, make sure your last stitch in the fabric before the corner comes up precisely at the point of the corner in your design.


Tip #3: Close parallel lines
When sewing rouleaux designs, you will often find yourself travelling back along a line to create a double thickness of rouleaux. When this happens, it can become tricky to maintain the stitching pattern we’ve established above.
In this case, use the thumb of your off hand to press the working rouleaux up against the first line of rouleaux. Stitch down into the fabric, and then up through the rouleaux like so:

The first rouleaux will help support the second and keep it standing upright. Once the two lines diverge again, continue in the usual stitch pattern.
Once you have completed your design finish off your rouleaux and thread just inside the seam allowance of your garment piece.
*
Ok! You’re all ready to go and create beautiful designs using rouleaux trim!
As always, if your have any questions, or if your would like to request a future tutorial, feel free to comment below.
Happy stitching!

Wow!
LikeLike
Thank you for this tutorial. I really appreciate the short videos you included in this post. Very helpful!
LikeLike
Thanks for the feedback! It’s always good to know that things make sense to more than just me!
LikeLike
This is so so lovely! Ditto on the videos! You’ve inspired me to do some rouleaux before jaf next year!!
LikeLike
What a wonderfully detailed tutorial! I like the way you can get very thin rouleaux by hand sewing from the right sides.
BTW – the presser foot of a sewing machine also makes an excellent clamp – especially useful if you’re doing a short section and don’t feel like getting out a sewing bird or clamp.
LikeLiked by 1 person
Oh good point! I think I have done that before, now that you mention it!
LikeLike
now my immediate thought on making up the roleau itself would be to turn it in twice and ladder stitch along the bottom edge rather than hemming it [because I’ve had experience of turning out handbag handles which is bad enough]. the method of attaching is ingenious. Now I am wondering whether there is any coincidence that this resembles superficially the quilled paper work which was also popular? and was Trapunto used ever for a similar look, where there was insufficient spare fabric to cut enough bias strips?
LikeLike
Thank you!!!!!!!!!!!!!!!!!!!!!!!!
LikeLike
This is so well explained! I can’t wait to use it on something! ❤ Thank you!!
LikeLike
Linda giddens Thank you, I can’t wait to try.
LikeLike
Wow. Learned something new!! I will be doing this very soon!! Thanks
LikeLike
It is beautiful. Great job & thank you for sharing how to do it. I love it!!!
LikeLike
Beautiful job Hannah and I learned a new trick with the rouleaux so thank you 🙂
LikeLiked by 1 person
I’ve seen this piped trim used on swan lake tutus made for Queensland ballet. Up close they look divine. Such a beautiful effect. Thank you for your instructions and videos…I like so many others can’t wait to give it a try. Thank you thank you thank you.
LikeLike
You’ve done a beautiful job, I love this Spencer! Did you keep a record of how many yards of rouleaux you used?
LikeLike
Thank you! I wish I had an answer, but if I did keep track, I can’t remember what it is and can’t find a record of it. It’s possible that I just lost the will to count after a point, lol. It’s a whole heck of a lot.
LikeLike
Excelente!!!! Muchas gracias! Voy a intentarlo, me encantó!!!!!!!!!!!
LikeLike
Very helpful tutorial and videos. Beautiful work.
LikeLike
Thank you for the wonderfully detailed instructions!!! I may try my hand at rouleaux now that I found your post!
LikeLike