I’ve been a bit slow about publishing recently, and there’s a good reason for that! This project has been taking up my whole life! I think it was worth it, though.
This project is the culmination of a couple of things I’ve been thinking about trying for a while. First: I wanted to make a spencer and petticoat set that hooks together at the waist, like this one circa 1815.

In the soggy heat of a Kentucky summer, a little trick like this can save me a layer on my upper body, plus it’s a fun little teaching moment at events, as most people don’t realize that women wore separates like this during this period.
Second: I wanted to make an outer garment trimmed with rouleaux (thin tubes of fabric). Rouleaux trim was a little journey of discovery for me, and you can read my tutorial on how I did it here.

La Belle Assemblée, January 1815 
La Belle Assemblée, 1814 
La Belle Assemblée, May 1815 
Spencer ca. 1815, Chertsey Museum 
Spencer ca 1820, MET
This is a selection of the inspiration for my spencer. I copied much of the rouleaux pattern from the spencer at bottom right because there are lovely clear pictures of it, and it had a similar feel to the fashion plate at the top left, which I particularly liked. I went with back details from another spencer, combined with the same motifs as the front and my shoulder caps were inspired by the fashion plate on the upper right. My spencer will someday soon have a tasseled belt as in the center fashion plate, but I haven’t had a chance to finish it!
I started the process with the Period Impressions 1809 spencer pattern, which I have long since modified until I have a basic spencer that fits me nicely. It’s a great base pattern for making Regency outerwear.


The pieces are put together using a technique I love, where the lining and fashion fabric are sewn together simultaneously. You put the two lining pieces you want to sew together right side to right side, and the two fabric pieces right side to right side, and then put them all together so that one matching pair of fabric and lining pieces are together, and the other matching pair are on the outsides. Then you sew all four pieces together, and when you open up the fabric and the lining, the seam allowances are sandwiched between.

You can find lots of pictures and information on how the rouleaux were made and applied in my tutorial, so here is a little gallery of the process.


And here are a few of the back rouleaux details.


Just in case there weren’t enough little tubes of fabric involved in this project already, there is also quite a bit of piping: on the edge of the color, on the center front edges, and between the bodice and the waistband.


The shoulder decorations are just petal shapes with piping around the edges, which are appliquéed onto the top of the sleeve. There is a rouleaux bow at the bottom, and I’m planning to add some little tassels hanging from it when I get the chance!


Some of the trickiest bits of decoration were the rouleaux designs on the cuffs. It took a while of staring at a photo to realize that every other loop is made while laying out the pattern in one direction, and then the gaps are filled in as you work your way back up, so that both ends of the piece end up at the top. This also got topped with a rouleaux bow, and like the shoulders will one day have some dangling tassels. I had to lay out the design in kitchen twine first (first photo) so I would know exactly how to proportion it and how long each rouleaux piece needed to be.


The waistband has a row of piping along the seam.


To finish the front edges, I sewed on a piece of piping with an extra long seam allowance, and used that allowance to encase all the other raw edges on the inside.


Finally–closures! The front of the spencer closes with hooks and eyes. There are also 9 hooks inside the waistband for attaching the separate petticoat.


Petticoats are a nice, quick little project–if you’re deperate for an extra outfit for an event, but don’t think you have time for a new dress, try adding hooks to a spencer and whipping up one of these! I plan to make a couple of these, and put waistband hooks in all my spencers, because it’s just such a nice little trick to have a walking outfit without any added heat or bulk.
The petticoat is made the way I make most of my 1816 skirts–the back piece is a rectangle the width of my fabric, and the front piece is narrow at the top to fit my front underbust measurement, and as wide at the hem as I can make it. The front waist edge is slightly shaped to help the skirt stand out in a nice bell shape without too much pulling at the sides or awkward clinging.


The whole thing is gathered onto a matching waistband.


I worked eyelets in the waistband to correspond to the hooks on the spencer. There are two at center front, one in each side front, one at each side, one in each side back, and two at the center back. These two overlap on a single hook at the center back of the spencer, which keeps the petticoat closed without the need for any additional closures.

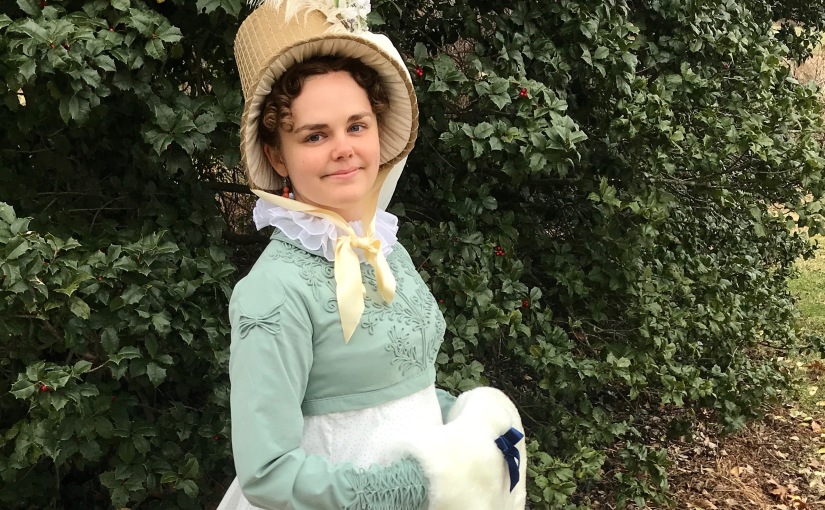
I wore this outfit during the day at Christmastide, and just about died of happiness. I’ve been working on the spencer since August, and it took so much longer than I anticipated. I gave up on a couple of other things I wanted to do in order to get it done, and I have no regrets! I am totally, completely in love with this outfit!
Sorry I won’t have a separate post about the bonnet–I started it ages ago and didn’t take any photos of that part of the process, and then it languished for a long time because I wasn’t happy with the brim. I finally pulled the brim off and drafted a new one, which I love! All the decorations came out of my stash, too, which made me happy! The veil is a scrap of lace left over from my wedding dress!
Here are a few progress photos of covering the bonnet.


And here are photos of the full ensemble at Christmastide at Locust Grove!


And here’s a little video that Brandon took, which shows everything really nicely! I’ve never felt more like I stepped out of a period movie! (In case I haven’t made it clear, I’m REALLY excited about this outfit!) I can’t wait to wear it again!
Happy New Year, everyone! I hope your 2019 is full of things that bring you as much joy as this project has brought me!

It has bern so fascinating to watch the process beginning to end. It is an extraordinary ensemble. Wear it in great health! Enjoy!
LikeLike
Thank you, Sharon!
LikeLike
I LOVE your trim! It is entirely worth the effort. It’s stunning! I appreciate your tutorial for making it as well. Maybe someday I’ll have the time to try it, but in the meantime I have too many other projects.
I haven’t seen the petticoat-hooking-to-spencer before. That’s a neat trick! I usually wear a bodiced petticoat with pelisses and spencers to minimize the bulk on top when it’s warm out. This idea is great because it will always keep the ‘waistline’ in the back at just the right height.
Best,
Quinn
LikeLike
Wow, the details on your spencer are amazing! Sure it feels good being clothed in such a fine dress!
I do, however, have aquestion: Did you take any photos of the following process?
“The pieces are put together using a technique I love, where the lining and fashion fabric are sewn together simultaneously. You put the two lining pieces you want to sew together right side to right side, and the two fabric pieces right side to right side, and then put them all together so that one matching pair of fabric and lining pieces are together, and the other matching pair are on the outsides. Then you sew all four pieces together, and when you open up the fabric and the lining, the seam allowances are sandwiched between.”
I think I don’t quite get how to do this, but it sounds like a super neat and easy sewing trick… Thanks a lot in advance!
LikeLike
Hi Stephanie! I’m always bad about taking pictures of that part! I think my best breakdown of it is in the post about my Hobbit bodice: https://fabricnfiction.com/2016/05/15/excellent-admirable-hobbits/
I’ll have to try to remember to take more detailed photos of the process next time I’m constructing something that way–it really is a great trick!
LikeLike
You look stunning! I learned so much from this post that I’m inspired to get to work on the Spencer I’ve wanted to make for ages.
LikeLike
I love this look so much! The trim on the spencer is stunning, and I love the idea of hooking a petticoat to the waistband. I will definitely be trying this!
I have a question about wearing the ensemble. Since the petticoat closes in the back and the spencer closes in the front – how do you put it on?
LikeLike
Thanks 🙂
I put on the spencer without doing up the front, then put on the petticoat and hook it to the waistband, then do up the front of the spencer.
LikeLiked by 1 person
I stumbled across your stunning work after searching “passementerie” in Pinterest. You have given me the inspiration I needed for the day! Thank you for sharing your beautiful work!
LikeLike