It’s been a wild five months, y’all. In January, I embarked on what I thought would be a 2-3 month project, and here at the beginning of June, I’m still putting the finishing touches in place. It’s been a long, inspiring, frustrating, and all-consuming project. It has pushed two months worth of other projects back, and has been the reason you haven’t heard from me here in more than three months.
But, the other day I put on the completed pieces. I’m still working out the details: jewelry, and wig, but the main part of the costume is done. I’ll be honest with you all, I was terrified when I put this costume on. I hadn’t actually tried it on for several months, not since I started working on the major embroidery. I had never tried it with the sleeves, I wasn’t sure how much things would weigh, and how that weight might affect the way the dress hung. I was afraid the whole thing might fall off my shoulders and be a disaster that I had to waste another several months fixing. Honestly, if that had been the case, I might have just thrown out the last five months and tried to forget that I ever attempted Daenerys Targaryen’s Dragonstone Landing dress from the first episode of Game of Thrones Season 7.
Luckily for my sanity, it wasn’t a disaster. Much to my delight (and somewhat to my surprise), I’m not sure I’ve ever felt so proud looking at myself in a costume. Even with no wig on (not to mention no pants, since I was just testing the fit of the dress and cape) I felt so. utterly. badass.
I’m not going to show you the finished product on me just yet–hopefully it will be photographed soon in all it’s glory by someone with more skill and a much better camera than my iPhone 7. But, here is the beginning of my saga of making a replica of this incredible costume, originally designed by Michele Clapton, and embroidered by Michele Carragher.


Hi-res images from FarFarAwaySite.
I have been wanting to make another Daenerys dress for quite a while now (you can see my first one here), and as soon as the promo images from Season 7 started to appear, I knew that this was the one. I loved, the structure, the cape (those shoulders! This was the first of Dany’s costumes to feature this silhouette, which she rocked through the final two seasons), and I especially loved the idea of attempting to replicate some of Michele Carragher’s embroidery.
But, before I could think about that, I had to think about understructure. Looking at the above photos, you can see that her torso is very smooth and stiff looking–the fabric fits closely with no bunching at the waist. You just don’t get lines like that without a corseted body and boned bodice. In this case, we also know from interviews that Emilia Clarke did wear a corset under her costumes. Because the waist is smoothed out, but the bust still has a natural roundness, I went with an underbust corset. I used Laughing Moon #113 to get the silhouette I wanted. (Now that I have this Late 19th century underbust corset lying around, I’m feeling the urge to add an 1890s riding habit or bicycling outfit to my wardrobe!) I’ll just go over the corset quickly before I get to the good stuff.


I made a very quick mockup of the corset out of heavy linen. This was mostly to check the length, since I have a very short torso, and have to shorten most commercial patterns. I wasn’t looking for a ton of waist reduction with this corset–I’m wearing it more for structure than anything else.


This corset is made with a single layer of coutil, no lining. The first step of the actual construction is to put a facing at each center back, which gives a nice double-layer to put the eyelets through.


The center fronts also get a facing, both for strength, and to give you somewhere to put the busk. In the left hand photo, the breaks in the seam that holds the facing to the front are where the loops of the busk will stick out. The posts of the busk come out through holes in the front made with an awl. Once the busk is in place, with the posts and loops through their holes, you stitch along the edge of the busk to hold it in place.


Pieces of bone casing get placed, first covering each of the seam allowances.


The top and bottom are bound with bias tape.

Well, that’s the understructure out of the way, now on to the main event. With my dressform padded out, I was able to start draping my pattern.


Working on the front.


The cape!
I am am always way too focused to remember to take photos during fittings, but rest assured that I did sew this up into a mockup, try it on, and make lots of adjustments (I think that’s the third iteration of the bodice front you see there, and I actually ended up altering it to have a princess seam instead of darts after this photo was taken) before I went ahead and did this:


I did the first round of bodice embellishment while the front was still in two halves. This started with making a section of smocking to look like dragon scales. Mine is done in silk habotai. Michele Carragher (the embroiderer from the show), has a useful tutorial on how to do this.


Here is a little video of the smocking process:
When the pieces were finished and pressed, I stitched them to the sides of the bodice.


The rest of the fronts are filled in with variations on fly stitch and feather stitch in grey and black silk thread.


This costume is particularly interesting in that it was actually used twice in the show. The dress was originally created for the finale of Season 6, and the cape, long undersleeves, and some details of the embroidery were added for the first episode of Season 7.
The red fly and feather stitch along the neckline and center front was one of the additions for the later appearance.


At this point, I decided that my grey thread was too light, so markers to the rescue!


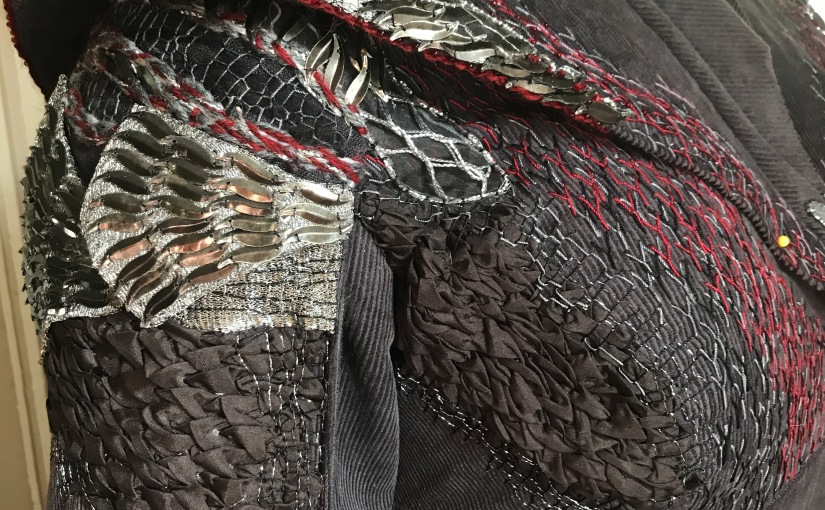
The next stitch was an interesting one to undertake. There is hardly any information about lock stitch online at all. I had to base my entire process on observing the finished stitch, and seeing what other cosplayers had done. The key to the lock stitch in this costume is to make it irregular and organic, so that it gives the effect of reptilian skin.


The stitch is formed by wrapping thread in alternating directions around long stitches. In this case I worked the stitch in two different threads: black silk, and a silver and black metallic.
With that preliminary embellishment done, I went ahead and put the dress together. It is grey corduroy lined with grey linen. The construction itself is not the most exciting, but the edge finishing is a nice little detail. The edges of the fabric and lining are turned under, and finished with prick stitching in metallic thread. There is also a row of metallic prick stitching where the skirt front attaches to the bodice. I love it when costumes incorporate period handsewing techniques that are rarely used in modern sewing!


Adding the side backs:


Constructing the back:


I made the sleeve drapes separately, and stitched them to the dress afterwards. They will tie at the center back.


At this point, it was time to finish the remaining edges. They are all prick stitched together with metallic thread.


The sleeve drapes are stitched to the dress along the top of the shoulder, and left to hang free in the back, where they will be tied together. These ties are what will bear a lot of the weight of the major embroidery later.


And with that, the dress is made and ready for the major embroidery!


I’m going to stop here, because this next bit definitely deserves its very own post, but here’s a sneak peek of what will be happening in the next installment! You can now read Part 2 here!


63 thoughts on “Dragonstone Landing Part 1”